
This has been a bit of a sanity project for me as I ruptured my Achilles Tendon and was stuck with my leg in plaster for 2 weeks unable to weight bear and totally not able to use a sewing machine! Ideally it would be lovely to make this on holiday whilst sunbathing on a beach but instead I was sat on the sofa with my leg aloft binge watching Queer Eye on Netflix!!!
I found an old embroidery hoop from my GCSE and Uni days and made a plan to sew (Way back when I won a competition with Oasis who used my embroidered jeans design as part of a display for the opening of their flagship store on Argyll Street, London)!
To be honest I haven't used any fancy pants embroidery stitches and I only had a little bit of embroidery thread in the right colours so just doubled up normal sewing thread. My aim was to 'paint' with thread and to see what happened...
MAKE TIME: This took me a day in total as I'd pick it up and sew for an hour when I had some free time or watching the telly during one week.
To make the embroidery hoop art you will need:
- An embroidery hoop (the one I used is 6 inches)
- Base fabric to fill the hoop (I used the cotton drill we use for our cushions)
- A sample of our fabric, available to buy here
- A selection of embroidery or sewing thread.
- Scissors
- Fabric Glue
Step One:
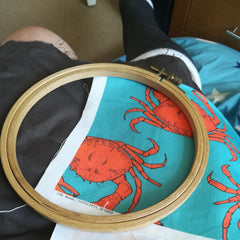
Place the backing fabric in the hoop and cut out the design from the m&h fabric, don't throw away the scrap piece of fabric!

Step Two:
Place the cut-out design on the hoop and hold in place with a very small amount of fabric glue, then sew along the edges with a running stitch. Once the main design is in place, I added a few snippets of the left-over fabric in the same way.


Step Three:
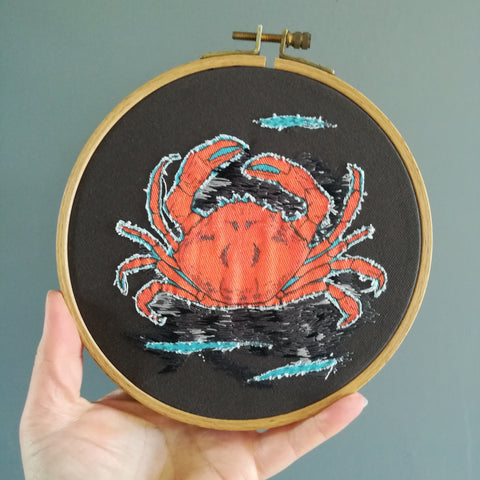
Sew! The idea for this hoop was to give the impression of a crab on a wet stone...So I only used grey and black thread using the snippets of fabric to represent water. I used a simple satin stitch all going the same way to fill space and create texture. (Mollie Makes has a great section on simple embroidery stitches here : http://www.molliemakes.com/home/library-embroidery-stitches/ as well as Most Craft here: https://www.mostcraft.com/
I filled the space that the length of the thread would fill and then ran a different colour thread through chunks of one colour to break it up a bit.


It's like painting with thread and you stop when you're happy with the picture!
There's loads of ways to finish the back of the hoop to make it look neat, here are some ideas: https://www.pinterest.it/pin/294985844326435882/?lp=true
Ta dah you've made a piece of embroidery hoop art!
I've loved rediscovering embroidery and have grand plans to create a piece of embroidery hoop art for every martha and hepsie design, so I guess this is the positive that has come from rupturing my Achilles (that and the fact that the kids are doing the dishwasher)!
H x
0 comments